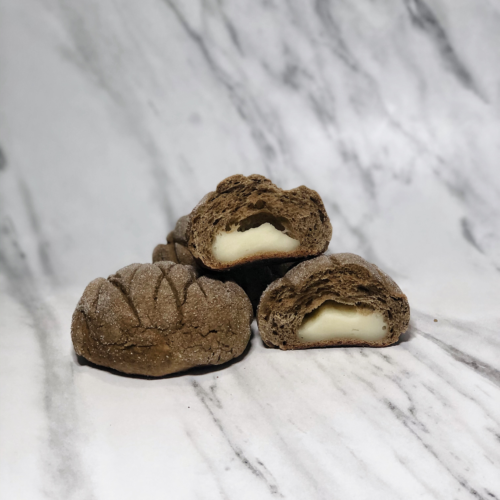
Hojicha Mochi Melon Pan
Equipment
- Oven
- Plastic wrap
Ingredients
Crust
- 93 g All Purpose Flour
- 50 g Sugar
- 5 g Hojicha Powder
- ½ egg approx 27g
- 27 g Unsalted Butter room temperature
Dough
- 206 g All Purpose Flour or Bread Flour
- 53 g Sugar
- 4 g Instant Yeast
- 21 g Unsalted Butter room temperature
- 41 g Water
- 41 g Milk
- 3 g Salt
- 5 g Hojicha Powder
- 1/2 Egg
Mochi (optional)
- 70 g Glutinous Rice Flour
- 20 g Corn Starch
- 20 g Sugar
- 1 1/2 tsp Vegetable Oil
- 120 g Milk
Instructions
To Prepare the Crust:
- In a large bowl, whisk softened unsalted butter until it becomes creamy.
- Gradually add sugar to the butter, whisking until fully combined and smooth.
- Slowly incorporate the egg yolk into the mixture, whisking thoroughly after each addition to avoid lumps.
- In a separate bowl, combine all-purpose flour and hojicha powder.
- Gradually sift the dry ingredients into the butter mixture, one-third at a time, mixing until a soft dough forms.
- Wrap the dough in plastic wrap and place it in the freezer for 30 minutes.
To Prepare the Dough:
- In a large bowl, mix bread flour (or all-purpose flour), sugar, instant yeast, and hojicha powder until well combined.
- Gently heat the milk and water until steaming, then remove from heat.
- Add the warm milk-water mixture and an egg to the dry ingredients.
- Mix until the ingredients come together to form a dough.
- Knead the dough by hand or using a mixer until it becomes elastic and smooth, about 20-30 minutes.
- Gradually incorporate softened (but not melted) butter cubes into the dough, continuing to knead until fully integrated.
- Once the dough is elastic, place it in a bowl, cover it with plastic wrap, and let it rise in a warm place for 2 hours.
To Prepare the Mochi:
- In a bowl, mix glutinous rice flour, corn starch, sugar, and milk until smooth and lump-free.
- Stir in the vegetable oil.
- Steam the mixture over high heat for 15-20 minutes until fully cooked.
- Allow the mochi to cool slightly, then knead for 5-10 minutes until smooth. Use gloves, as the mochi will be sticky.
- Wrap the mochi in plastic wrap and refrigerate for 30 minutes.
To Assemble the Melon Pan:
- After the dough has risen, gently punch out the air and divide it into 8 equal portions, about 45g each.
- Shape each portion into a ball, cover with plastic wrap, and let them rest for 15 minutes.
- Remove the mochi from the fridge, dust it with flour to prevent sticking, and divide it into 8 equal portions. Shape each portion into a ball.
- Flatten each dough ball and place a mochi ball in the center. Seal the dough around the mochi, ensuring it is fully enclosed.
- Place the filled dough balls in a container, cover with plastic wrap, and freeze for 30 minutes.
- Meanwhile, take the crust dough out of the freezer, divide it into 8 equal portions (about 20g each), and roll them into balls. Flatten each ball.
- Remove the dough balls from the freezer and carefully place the crust over each one, ensuring it covers the entire surface.
- Roll each crust-covered dough ball in a bowl of sugar to coat.
- Place the dough balls on a baking sheet and allow them to rise for 1 hour in a dry, draft-free environment. Do not turn on the oven or add hot water during this step.
- Preheat the oven to 180ºC (356°F).
- Once the dough has doubled in size, bake in the preheated oven for 10-12 minutes, or until the crust is golden brown and the dough is cooked through.
- Allow the melon pan to cool slightly before serving. Enjoy your homemade hojicha mochi melon pan!
Tried this recipe?Share and mention @likebyregina or tag #likebyregina!
We are a participant in the Amazon Services LLC Associates Program, an affiliate advertising program designed to provide a means for us to earn advertising fees by linking to Amazon.ca and affiliated websites.